1974 HONDA ST90
PAGE UNDER CONTRUCTION
MORE TO BE ADDED DAILY
last updated" July 20, 2025
Honda ST90..... before.....

Honda ST90.... after....
Pics take out back for collector plates.
May 4, 2025
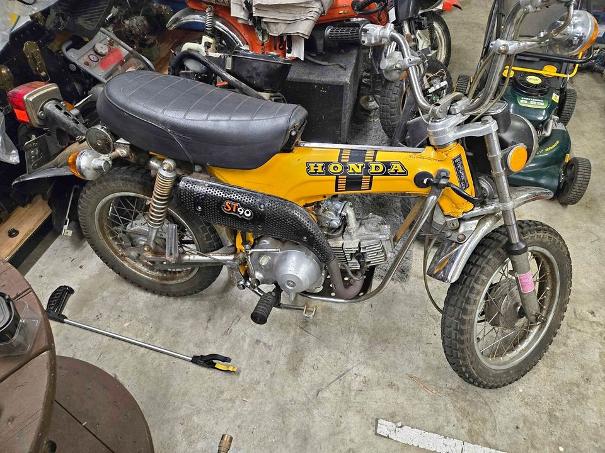
Here is the beast out in our back alley
running....
June 20, 2025
This bike hqs literally been a Godsend. I use it almost every doy to bomb some where to pick up some stupid thing. Sure beats the hell out of lugging my Chevy truck around town trying to find parking.!!! It is getting just over 90mpg!!!
Honda ST90.... Reliving my childhood
June'ish 2024
Being over 50 leads most men into desperately trying to relive their childhood. What they enjoyed back then they want to replace in their lives today. And since fixing ourselves seems really hard and fixing women being impossible most men drag some old piece of shit home and try to fix it instead. After all men love to "fix" things... so that was all it took. You see I was born on a Honda CT70. This was not exactly the same but was the same body style. Thus I opted to dragger home from Market Place....
Here she looks to be in a lot better shape than she actually was. She did run though and that is always a good thing. My Dad used to always say... "What use is Grannie if she can no longer chop fire wood?" Now with three Harley's in my living room the last thing I needed was another bike but.....
The upsides to this one was the sticker price of $1350 canadian, it ran and it only had 1200 miles on it. The downsides were it was stored in a damp mud floored shed for years.
Now since this piglet is 51 years old I will be putting it back to original. Yes I could put a bigger Sheep Shite Shina engine in it but that would be like putting lipstick on a pig... seriously... if you need more power buy a bigger bike there are millions of them out there!!! Now since these ST90's were only made for three years I opted to go the original route.
Any videos posted here will be lousy but... could be helpful to anyone doing a refresh on one of these bikes. My plan was to do a lot of videos documenting every step... I have had a lot of "plans" in life... : ) Anyway hopefully you find some tips that help you with yours.
Oh... and if you think I have even the slightest clue as to what I am doing you would be wrong. As with this hole site... it is for entertainment purposes only!!!

THE CONTRAST IS INTERESTING...
hmmm..... I need to rearrange my living room....
OK...Reality Kicks In
Whooooeee!!!! Now that it's morning and the booze has wore off it's pretty easy to see she looked a lot better in the dark!!!!
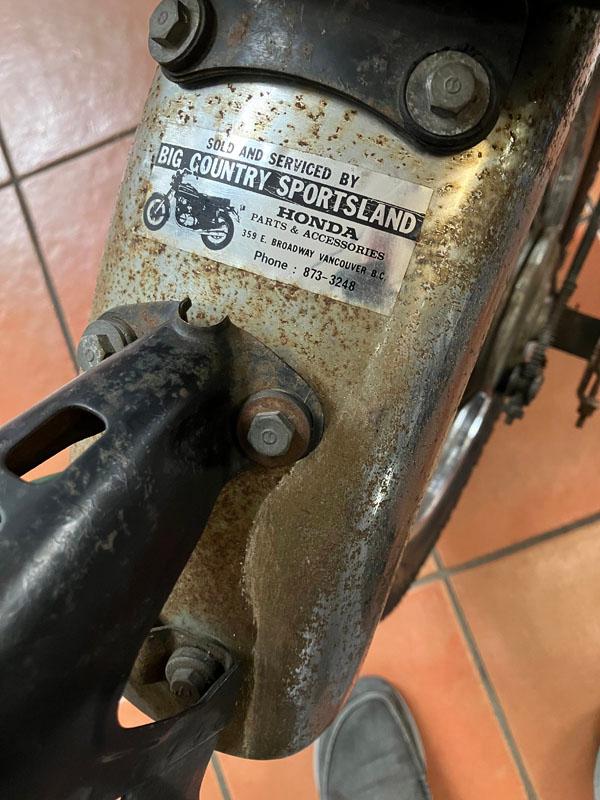
Yup.... I actually did save that vintage bike shop decal. with the right glue I am hoping I can get it back onto the rechromed fender.
Where To Start?......
The Paint
November 3, 2024
So after some reflection I decided to actually start with the paint. The reasoning for this if I could bring the paint back then it would be worth doing a low buck resto on it. To redo the paint that would turn it into a frame up project. Something I did not have the time or desire to do. Not only that putting newer paints on these bikes is like putting lipstick on grannie, The new paints are way too thick and glossy. Makes it look like something out of the early 90's. The original paints were thin and cheap. And my goal was to keep it original as I could. Turn it into a surviver in very good shape.
Now typical I did not get any good before close up pics of the paint. The right side of the above photo has some cut polishes on it... The left side though was what it was all like.. The black stuff would not wash off but did come up with some elbow grease and cut polishes.
The paint was actually far worse than the pics showed so was quite concerned. Though once I figured out I had recovered the paint enough I then I opted to go ahead with the project.
To do this I started with autosol and ultra fine steel wool. If you do this watch your steel wool to see that you are not pulling off too much paint!!! The original paint was very thin to start with. Too much ambition will ruin what you have. Thus you have to work slowly and carefully. Now for some of the heavy rust spots I used a gelled rust remover... that though screwed up because it bleached the color out of the paint where it ran down. I lucked out and was able to polish the lighter color out. After the autosol was polished out I took a fine Turtle polishing compound to it and then finally some of my favorite wax I will show below.
I should note I have had a ton of experience working with paint finishes on vintage cabinets I try to salvage. One vintage cabinet I bought was a beauty but had been spray painted flat black. Using tricks I picked up I was able to get the black paint off the original green underneath without damaging the green. Then polished the green back to worn but new looking shape. That one was tricky.
OK... Paint Will Work... next.... Fenders?......
The Fender Story...
November 3, 2024
OK... now that I have taking the lid off the cana worms.... I guess it is what's next? So I guess it is the fenders and engine guard. They were both really bad!!!
So here is the long winded fender story.... The chrome is heavily pitted and rusted as you can see above. The front one was not quite as bad so I opted to play with it first.
My first step was to make up a fresh batch a "homemaid" Evaporust. I have been an absolute fan of Evaporust for years. There are a few different types of rust remover I use but Evaporust is my favorite.. The main reason is it only eats off the rust. It does not etch the metal nor does it affect the paint like other rust removers do. When trying to revive the original patiina on a vintage cabinet for my cabinet collection this is vital!
Home Maid Evaporust
Now I used to always buy Evaporust in the 3 or 4 gallon pail. Up here in Communist Canaduh it ruins a hundred dollar bill.... then started seeing these videos on youtube where wing nuts not unlike myself were making it themselves. So after watching a bunch of videos on it opted to giver a try. Turns out I can't tell the difference other than the home maid version seems to last a lot longer and costs a hell of a alot less..
Next...... Rims and Tires volume one...
The Rims and Tires for'er
Though at a distant the rims on this looked ok... but up close the rust was heavy duty. After some looking on line I found these on Ebay. They looked cheap at two for 149.... us.... shipping extra.. exchange,.... then when they get to communist canaduh the mob sticks you with more fee's.... final cost 425 for the two... Still not bad for two brand new rims... Time of course will tell the quality but dam they sure look good! Now they also seemed to get here fast. Considering that once they reach Canaduh they go onto pack horses until they reach the final destination.
The link for the rims is: click here
The link for the tires is: click here
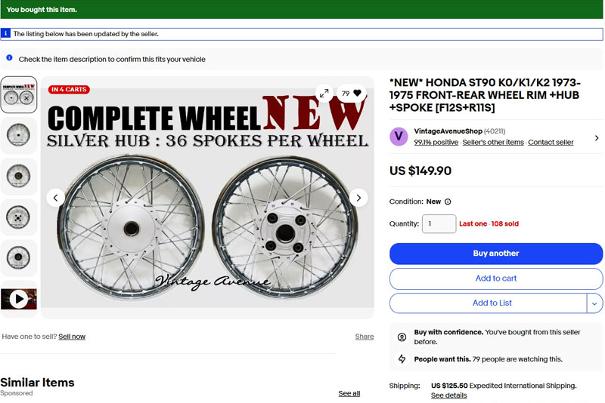
The Rims from Ebay
click on picture for link
Bought these two rims off eBay.... they were not easy to find.. The odd ball ST90's you will find ,if you haven't already, that they are not near as easy to find parts for as are the CT70's. In case you are worrying... The set I bought was the last set also. That said... I would buy them now while the getting is good....
By the time I got them to up here in Canaduh there were about 215 each. Remember our government has all but destroyed Canada economically. Trudoughead was hoping to make Canada into Cubanada in his father's memory. He got close but failed so the WEF sent in some back up help... a used car salesman and part time sheep herder named Carnie Val. This won't end well for Canaduh
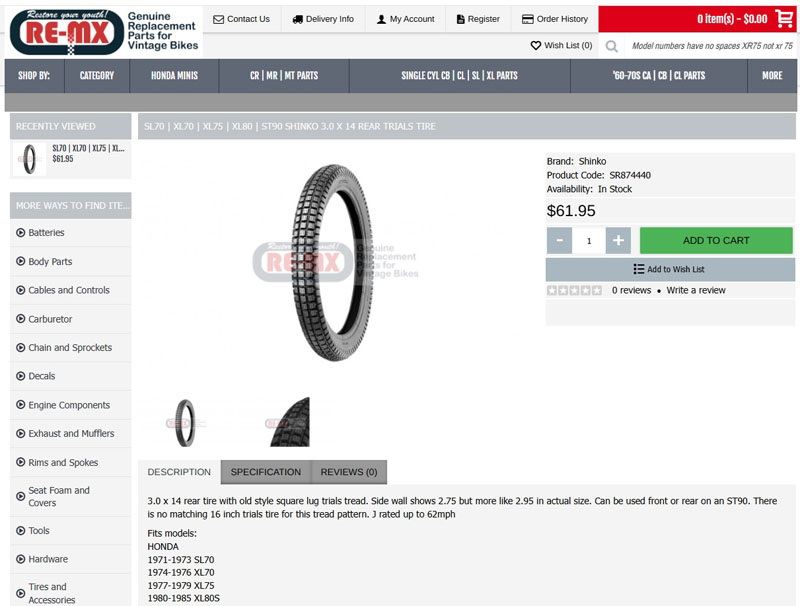
New Tires....
Had one helluva time trying to find some tires for this piglet. The front tire is fine for me. The back one was sitting in the mud and has one spot that is very dried out rotted and cracked..... Actually I was starting to get a little nervous about finding any at one point. When I first came here they were out of stock... Was about to give up when by fluke I came back here and viola they had stock again!!! I wasn't taking any chances so ordered a set.
Size wise like the page says they say they are 2.75 14's but do actually look exactly like 3,00 14's that are on it. At least from what I can tell as the original ones are still mounted and inflated and these new ones are not. Even if they do end up looking smaller they will definiitely work.... duct tape can only go so far when it comes to fixing rotted out tires!!! : )
Now dealing with these guys was really weird. It was like they were lost in time and stuck back in the fifties when places would offer real service!!!
Somehow they missed sending my confirmation email so I contacted them just to confirm. The guy there writes me back appologizing and says he threw in a set of tube protectors for the rim. Well I was like "jackspot" I forgot to order them!!! Turns out he threw them in free of charge!!! Who the hell does stuff like that any more!!! I will of course be buying anything I can from these guys in the future!!! Click on the picture to go to the page.
More Rims and Tires..
.
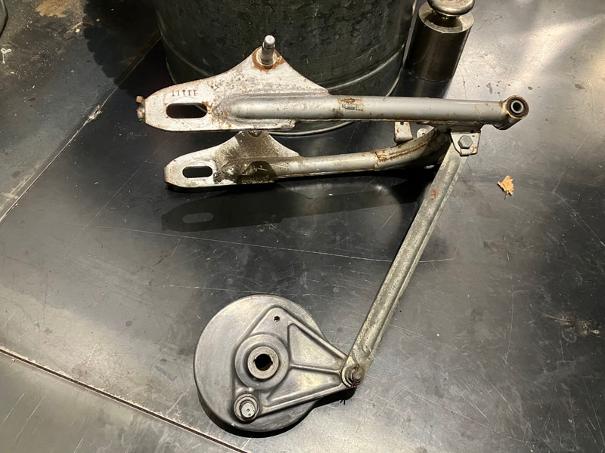
The Rear Swing Arm....
So here is the rear swing arm.... Once again the photo makes it actually look better than it really was. Since I was not sure what I was going to do I first soakeder in the rust solution for a day. Eventually though I opted to taker down to our common shop here which has a sandblaster cabinet and cleaned it off for some paint. Again because of the price of film these days... I did not get many shots... : )
You can see the rear brake backing plate here. I had gone over it heavily with the cheap temu wire brushes and it did make a huge difference but still needed the polish like in the video I hope to post soon.
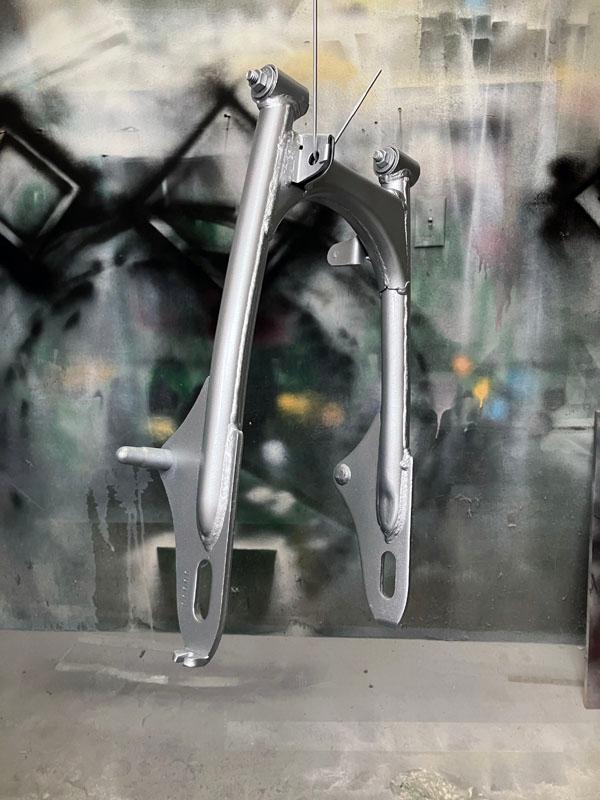
Rear Swing Arm Painted
Here is the rear swing arm after I painted it. After I unbolted it,covered and plugged all the threaded holes I then took it to our sandblasting cabinet we have set up in our community shop in the basement. It was perfect since the sand in it was well used thus a lot finer. The finer sand does not impact the original metal as much.
I then gaver a coata primer... followed by the silver a hour later and then finally a couple of spaced out coats of clear tremclad a few hours after that. Not sure how well it will hold up but seems fine. At least for now this bike will be a bit of a panzy city bike... not much gravel and will be stored next to my Harley's by my couch.

PhatMX
as in
phatmx.com
Yes... PhatMX.... what a Godsend!!!! This is another one of those weirdball companies that still think good service is important!!! Keith there has been extremely helpful when it came to answering all my dumb questions.
Now since ST90's are a bit of an odd ball duck only sold for three years in America they don't have a lot of stuff for them. But what they do have is good quality. So far most of the parts I have bought for this have been through these guys.
I am now praying that I don't find a vintage CT70 I am so desperately looking for! : )
Click on the image to go to their site
Tips and tricks
Read this first before you begin your project
- Take photos.... Now lets face it.... if you are here odds are you are a bit of a self proclaimed genius not unlike myself! That's great but say what you want your memory is not near as sharp as you think it is!!! So... take photos.... lots of them... up close.... under the seat, under the engine, inside the back fender, the wiring, take waaaaayyyy too many and of every angle. Pretend you are doing a 3D scan of its surface with a goal to overlap all the different angles. Film is cheap!!! They will be a Godsend later. As a cheap giver of advice it did not take me long to realize I did not take near enough pics and especially videos... You can't go back in time. One pic is worth a thousand memories!!! Do this especially if you get interrupted often like I do.
- Get a sheet of plywood to lay everything out on. Circle clumps of bolts and using chalk mark where they go. Make notes on the side.
- Don't throw away one dam thing you take off the bike!!! Do that after you have put about five nundred miles on the bike... Otherwise you risk being reeeel sorry. Especially if you are doing one of these bikes... parts are not near as plentiful as they are for the CT70's and 50's.
- Don't lose one thing!!! I thought I lost a muffler rear mount piece... there was only one on eBay... 6 weeks to get it up here in Canaduh... You don't want to be burning up nice weather waiting for one lost piece you thought you never needed or plain lost before you can go riding.
- Watch my homemade rust solution video. You will definitely need it if you bought one of these. Make your solution tank up before you start. I used a five gallon plastic pail. I bought an aquarium pump and aireator and put that in the tank for larger pieces to circulate the solution. I think that helps... but not totally sure.
- Plan ahead for what parts you will need next and order them in advance. If you think you are not going to spend much... you will likely be doing a hack job. Dam shit adds up quick.
- Savor the process... idiots hurry. Think of the restoration process as foreplay... That way when you hit frustratiing obsticals you won't get all bent out of shape ruining the moment. Frustrating obsticals is why the average joe schmo never restores a bike. Beating them builds your character. It took me decades to figure out how to get more done quicker. Now I purposely try to go slower. If something slows me down I go even slower yet. Take a couch break. No resistance. If you get frustrated while working on your project... you probably got the wrong project. Remember life's a drag.... and then you die... so you may as well at least enjoy it!!! Oh... and a tantrum is a tantrum... when little girls have one they pound their fists on the floor and scream... when big men have one they curse, throw things, stomp around, yell at people and quit what they are doing. It is still a tantrum.... don't be a little girl....
- Small zip lock bags are vital for around a shop. I have lots in different sizes. Great for sorting and tagging small parts. I know... you will be putting it back together next weekend... except you forgot... the wife has different plans... for you next weekend. Time sneaks by like water through a pile of boulders.